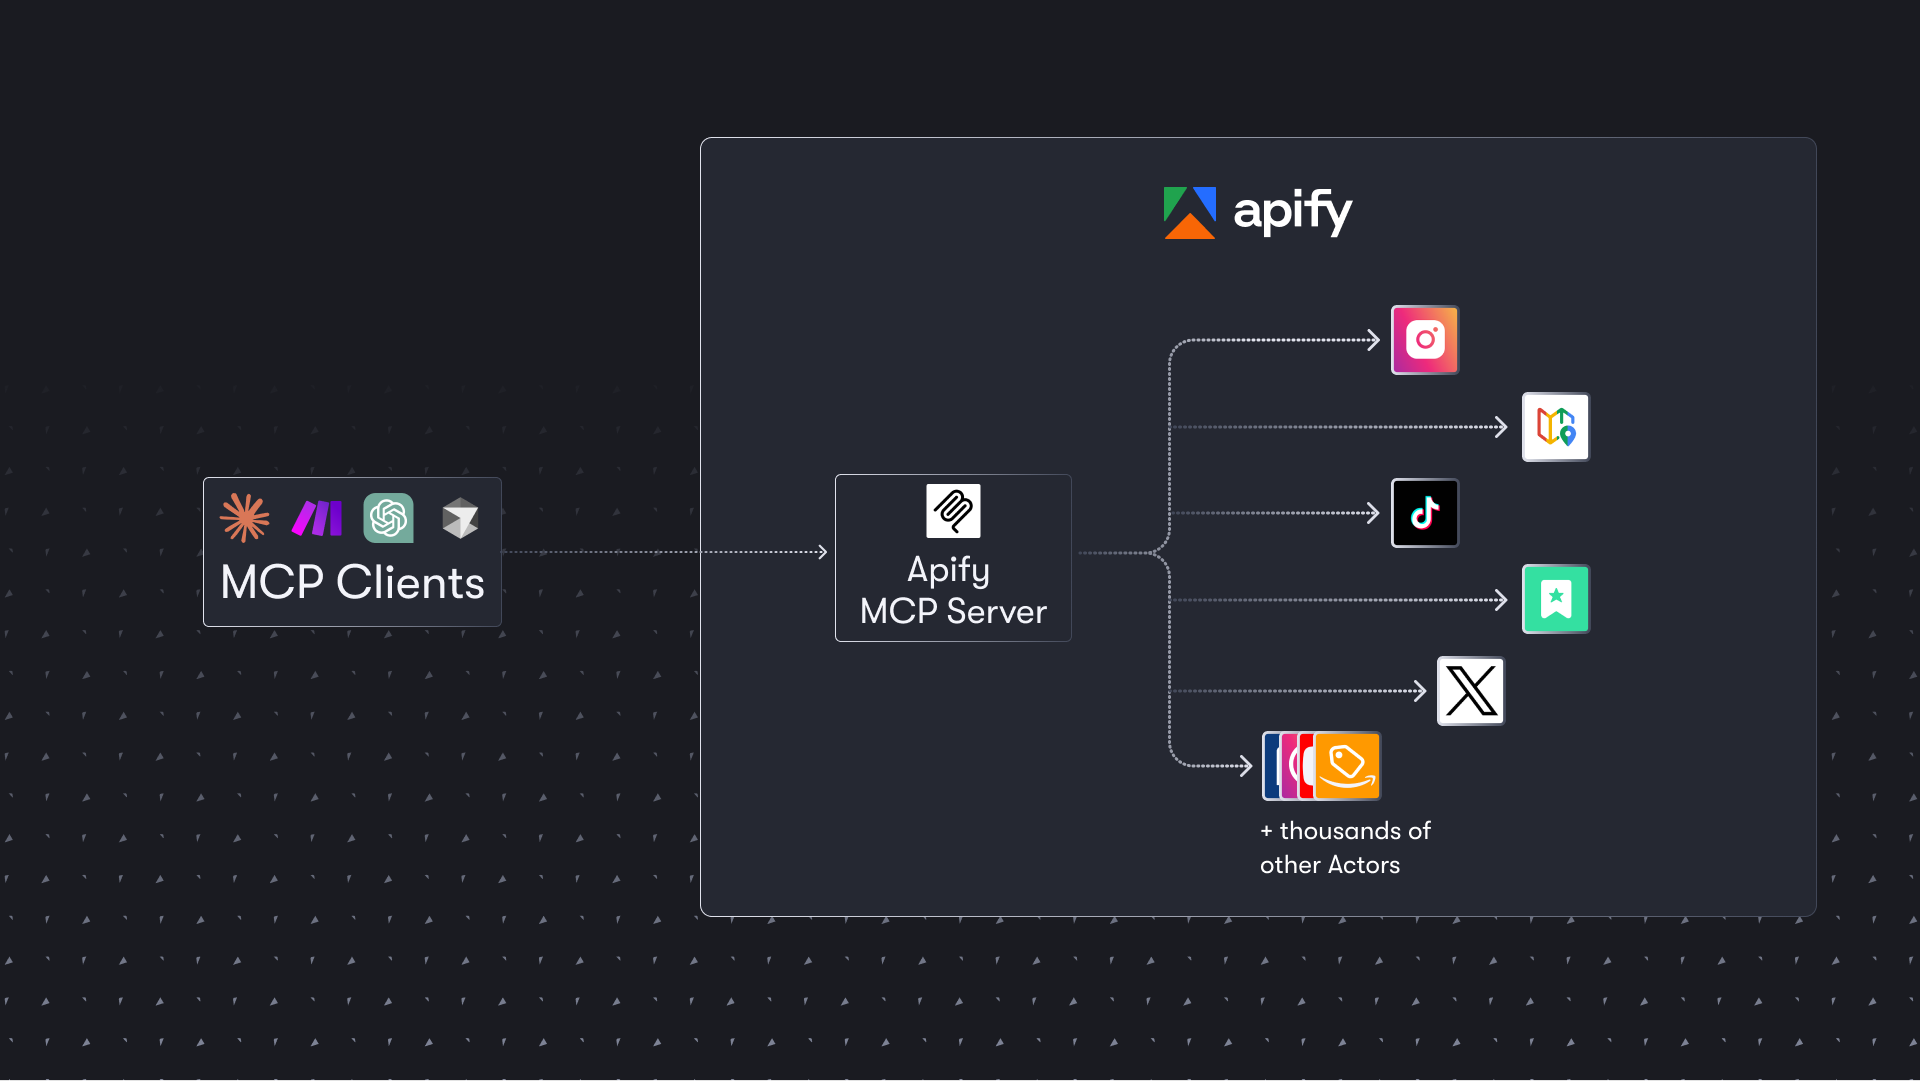
The Apify MCP Server allows AI agents to leverage thousands of ready-made scrapers and automation tools from Apify Store to extract data from various websites. It is ideal for agents needing to gather structured data from social media, search engines, or e-commerce sites for research or operational tasks.
USP
This server uniquely integrates AI agents with the vast Apify Store ecosystem, offering agentic payments and dynamic tool discovery for seamless, cost-effective web data extraction without API tokens for certain payments.
Use cases
01Extracting data from social media posts
02Scraping Google Search Results Pages (SERPs)
03Gathering contact details from Google Maps
04Automating web data collection for research
05Integrating web scraping into AI agent workflows
Detected files (5)
.claude/skills/bug-triage/SKILL.mdskill
Show content (6713 bytes)
---
name: bug-triage
description: >-
  Triage open GitHub bug issues for Apify MCP server. Fetches issues, analyzes
  root causes, drafts developer-to-developer responses, and posts after user
  approval. Use when handling user bug reports, responding to issues, or
  cleaning up stale bugs.
argument-hint: "[issue numbers] [--label <label>] [--all]"
allowed-tools: [Read, Glob, Grep, Bash, WebFetch, Agent]
---

# Bug Triage

Triage open bug issues on `apify/apify-mcp-server`. Analyze, draft responses, get approval, post.

## Permissions

- **Read-only by default**: listing issues (`gh issue list`), viewing details and comments (`gh issue view`) — do these automatically, no need to ask.
- **Write requires approval**: commenting (`gh issue comment`), closing (`gh issue close`), editing (`gh issue edit`) — **always present the draft and wait for explicit user approval before executing**.

## Step 0: Parse arguments

`$ARGUMENTS` controls scope:

| Input | Behavior |
|---|---|
| `623 641 639` | Triage specific issue numbers |
| `--label bug` | Triage all open issues with label (default: `bug`) |
| `--all` | Triage all open bug-labeled issues |
| _(empty)_ | Same as `--all` |

## Step 1: Fetch issues

Use the arguments parsed in Step 0 to determine what to fetch.

**If specific issue numbers were provided**, skip the list queries and fetch each issue directly:

```bash
gh issue view <number> --repo apify/apify-mcp-server --comments
```

**Otherwise** (label mode, `--all`, or empty), fetch open bug reports. Use the label from Step 0 (default: `bug`). Bug reports come in two forms — find both:

1. **By label**: issues with the parsed label
2. **By title prefix**: issues with `[Bug]` in the title (the bug report template adds this, but the label isn't always applied)

```bash
# By label (use the label from Step 0, default: bug)
gh issue list --repo apify/apify-mcp-server --label <label> --state open --json number,title,labels,createdAt,body --limit 30

# By title prefix (catches unlabeled bug reports)
gh issue list --repo apify/apify-mcp-server --state open --search "[Bug] in:title" --json number,title,labels,createdAt,body --limit 30
```

Merge both lists and deduplicate by issue number.

For each issue, fetch full details **including all comments** (comments often contain the real context):

```bash
gh issue view <number> --repo apify/apify-mcp-server --comments
```

**Always read comments before drafting a response.** Previous team members may have already replied, asked for details, or provided workarounds. Don't duplicate existing responses.

## Step 2: Categorize each issue

Assign one of these categories:

| Category | Criteria | Typical action |
|---|---|---|
| **Known fix** | Root cause is clear, documented fix exists | Draft response with fix, optionally close |
| **Not our bug** | Server logs show it works; issue is in the MCP client (Claude Desktop, Cowork, etc.) | Explain findings, suggest workaround |
| **Duplicate** | Same root cause as another open issue | Comment with link, close as duplicate |
| **Needs info** | No logs, no config, vague description | Ask for specifics |
| **Stale** | We asked for info, no reply for 2+ weeks | Close with helpful pointer |
| **Actionable bug** | Real server-side bug we need to fix | Acknowledge, investigate further |

### Common root causes (from past triage)

These patterns recur. Check for them first:

1. **SSE endpoint removed** (April 1, 2026): Users on `/sse` URLs get connection failures. Fix: switch to `https://mcp.apify.com` (streamable HTTP).

2. **"Tools connected but Claude ignores them"**: MCP server logs show successful handshake and `tools/list`, but Claude doesn't use the tools in conversation. This is a Claude Desktop/Cowork behavior, not an Apify server bug. Users need to explicitly ask Claude to use Apify tools.

3. **"Unable to connect to extension server"**: Claude Desktop extension install issues. Usually caused by corrupted npx cache, Claude silently downgrading the extension, or Node.js not on the GUI app's PATH. Fix: use the remote server `https://mcp.apify.com` as a custom connector.

4. **npx cache corruption**: Stale cache prevents stdio server from starting. Fix: `rm -rf ~/.npm/_npx` (macOS/Linux) or `rmdir /s /q %LOCALAPPDATA%\npm-cache\_npx` (Windows).

5. **Claude Desktop connector downgrade**: Claude Desktop silently downgrades connectors to older versions. Fix: remove and re-add the connector.

## Step 3: Draft response

**Style rules:**
- Developer-to-developer, plain language
- Concise — 3-8 lines typical, no fluff
- Acknowledge the issue and apologize briefly if the user is stuck
- Reference documentation when a fix or troubleshooting guide exists
- If the server works correctly (logs prove it), say so clearly
- If closing, explain why and point to where to go next

**Key documentation links:**
- Setup guide: `https://docs.apify.com/platform/integrations/mcp`
- Claude Desktop troubleshooting: `https://docs.apify.com/platform/integrations/claude-desktop#troubleshooting`
- Configurator: `https://mcp.apify.com`

**Use Apify MCP tools** (`search-apify-docs`, `fetch-apify-docs`) to find the right doc link if the issue touches a topic not covered above.

**The default recommendation** for connection issues is the remote server:

> Add a custom connector in Claude Desktop with URL `https://mcp.apify.com` and follow the OAuth flow.

## Step 4: Present and get approval

Present each issue to the user with:
1. **Issue number + title + link** (`https://github.com/apify/apify-mcp-server/issues/<number>`)
2. **Category** (from Step 2)
3. **Summary** — one line on what's going on
4. **Proposed response** — the draft comment in a blockquote
5. **Proposed action** — comment only / comment + close / close as duplicate of #X / skip

**MANDATORY: Wait for explicit user approval before posting anything.** Never post, close, or modify an issue without the user saying yes.

## Step 5: Post

After approval:

```bash
# Comment only
gh issue comment <number> --repo apify/apify-mcp-server --body "<response>"

# Comment + close
gh issue comment <number> --repo apify/apify-mcp-server --body "<response>" && \
gh issue close <number> --repo apify/apify-mcp-server

# Close as duplicate
gh issue comment <number> --repo apify/apify-mcp-server --body "Closing as a duplicate of #<other> — same root cause. We'll track and update there." && \
gh issue close <number> --repo apify/apify-mcp-server
```

Then move to the next issue. After the last one, print a summary table:

| Issue | Category | Action taken |
|---|---|---|
| #623 | Known fix | Commented, SSE migration |
| #639 | Duplicate | Closed as dup of #641 |
| ... | ... | ... |
.claude/skills/dig/SKILL.mdskill
Show content (8151 bytes)
---
name: dig
description: >-
  Explore, analyze, plan, or spec features for the Apify MCP server. Adapts to
  what the user asks — from quick code exploration to full GitHub issue specs.
  Use when the user asks to explore code, understand behavior, plan a change,
  design a feature, or create an issue spec.
argument-hint: "<your request> [--sdk <path>] [--ext-apps <path>] [--internal <path>]"
allowed-tools: [Read, Glob, Grep, Bash, WebFetch, WebSearch, Agent]
---

# Dig

Flexible skill for exploring, planning, and speccing work on the Apify MCP server. **Do NOT edit source files** — this skill is for understanding and planning only.

## Step 0: Parse arguments and determine intent

`$ARGUMENTS` contains the user's request and optional repo path overrides.

**Flags** (optional):

| Flag           | Default                          | Purpose                        |
|----------------|----------------------------------|--------------------------------|
| `--sdk`        | `../typescript-sdk`              | MCP SDK source repo path       |
| `--ext-apps`   | `../ext-apps`                    | MCP Apps SDK source repo path  |
| `--internal`   | `../apify-mcp-server-internal`   | Internal server repo path      |

Everything not matching a flag is the **user's request**.

**Resolution order** for source repos: flag path → default sibling path → `node_modules/` (compiled types only) → GitHub URL (last resort). Always verify the path exists before using it.

### Determine the intent

Infer the intent from the user's natural language. There are three modes:

| Intent | What you do | Examples |
|--------|-------------|---------|
| **Explore** | Read code, explain findings, answer questions | "how does tool naming work", "look at the widget code", "why is this broken", "what would break if we change X" |
| **Plan** | Enter plan mode, design the approach, assess impact | "plan implementing resource links", "figure out how to refactor metadata", "design the simplification" |
| **Spec** | Plan + create GitHub issues | "write an issue for X", "create a spec for Y", "spec out resource links" |

**Rules:**
- Default to **Explore**. When in doubt, do less — the user can always ask for more.
- Only enter plan mode for **Plan** and **Spec**.
- Only create GitHub issues for **Spec**.

## Step 1: Explore

Read the relevant source files and explain your findings. This is the baseline for all intents.

**What to do:**
1. Read the relevant source files in this repo
2. Check similar existing features as reference
3. Only check the internal repo, MCP SDK/spec, or MCP Apps SDK/spec if the user's question touches those areas
4. If you spot a related open issue, mention it casually — but don't go searching for issues unless it's relevant

**Stop here if the intent is Explore.**

## Step 2: Plan (Plan and Spec only)

Use the `EnterPlanMode` tool, then design the approach.

**What to do:**
1. Assess internal repo impact (check `../apify-mcp-server-internal` if available)
2. Check MCP spec/SDK if the feature involves protocol behavior
3. Check MCP Apps spec/SDK if the feature involves widgets or interactive UIs
4. Use `mcpc @stdio tools-call` to probe current behavior if useful (requires `npm run build`)
5. Follow key conventions (see below)
6. Ask clarifying questions if ambiguous — prefer narrowing scope over guessing intent

**Key conventions:**
- **Simple > complex, ruthlessly minimal** — only what's explicitly in scope
- **Reuse before creating.** Search for existing helpers and patterns. Extend what exists.
- **Smallest possible change.** Ask: is there a simpler way using what's already there?
- **Zod** for input validation, **HelperTools enum** for tool names
- Integration tests go in `tests/integration/suite.ts`
- Changes may affect `apify-mcp-server-internal` — always assess impact
- **Public/internal repo separation**: See `CLAUDE.md § Public/internal repo separation`
- See `CLAUDE.md`, `CONTRIBUTING.md`, and `DEVELOPMENT.md` for full conventions

**Stop here if the intent is Plan.** Exit plan mode with `ExitPlanMode`.

## Step 3: Spec (Spec only)

Create GitHub issues. First exit plan mode with `ExitPlanMode`.

### Check existing issues

Search for duplicates and related issues:

```
gh issue list -R apify/apify-mcp-server --search "<keywords>" --json number,title,state
gh issue list -R apify/ai-team --search "<keywords>" --json number,title,state
gh issue list -R apify/apify-mcp-server-internal --search "<keywords>" --json number,title,state
```

If a matching issue exists, update it with `gh issue edit` instead of creating a new one.

### Create issues

**One issue per implementation phase.** A phase = one PR-sized unit of work (~50-200 lines changed). Each issue should be independently implementable.

Use the repo's `feature_spec.yml` template. Only the **Problem** and **Proposed solution** fields are required. Include **Plan** and **Alternatives considered** only when they add real value. No fluff, no filler — straight to the point.

```markdown
## Problem
[Concrete evidence: error messages, user reports, issue links. Not "users are confused" — instead "3 users reported X in #channel".]

## Proposed solution
[Short. Reference existing code paths. List files inline if needed.]

## Plan
- [ ] Step 1
- [ ] Step 2

## Alternatives considered
[Only if you actually evaluated other approaches.]
```

**Style** (applies to issues AND all dig output — explanations, plans, specs):
- Plain language, no fluff — see `CLAUDE.md § Communication style`
- Skip any section that would be empty or generic
- 10-30 lines, not 100
- Concrete steps > prose

**Self-review before presenting:**
- Is this the minimal design? Could scope be smaller?
- Am I reusing existing patterns or reinventing?
- Could this adjust existing code rather than add new code?
- Does it require refactoring first? If so, that's a separate issue.

Present issue content to the user for review before creating. Use `gh issue create` with `t-ai` label.

## Available resources

| Resource               | Path / URL                                                          | Use for                                                     |
|------------------------|---------------------------------------------------------------------|-------------------------------------------------------------|
| **Public repo**        | `.` (this repo root)                                                | Main codebase — tools, widgets, tests                       |
| **Internal repo**      | `../apify-mcp-server-internal` (if available)                       | Hosted server — assess impact of changes                    |
| **MCP SDK (types)**    | `node_modules/@modelcontextprotocol/sdk`                            | Protocol types, server/client APIs (compiled only)          |
| **MCP SDK (source)**   | `../typescript-sdk` (if available)                                  | Examples, tests, full source — faster than GitHub           |
| **MCP spec**           | `https://modelcontextprotocol.io/specification/2025-11-25`          | Protocol-level features                                     |
| **MCP Apps SDK (types)** | `node_modules/@modelcontextprotocol/ext-apps`                     | MCP Apps types, React hooks, server helpers (compiled only) |
| **MCP Apps SDK (source)** | `../ext-apps` (if available)                                     | Examples, tests, spec, full source — faster than GitHub     |
| **MCP Apps spec**      | `https://github.com/modelcontextprotocol/ext-apps/blob/main/specification/2026-01-26/apps.mdx` | MCP Apps extension specification                            |
| **Dev server (no UI)** | `http://localhost:3001/` / tools: `mcp__apify-dev__*`               | Test tools without widgets                                  |
| **Dev server (UI)**    | `http://localhost:3001/?ui=true` / tools: `mcp__apify-dev-ui__*`    | Test tools with widget rendering                            |
| **mcpc stdio**         | `mcpc @stdio tools-call ...` (requires `npm run build`)             | Test tools — no running server needed                       |
.claude/agents/mcpc-tester.mdagent
Show content (8538 bytes)
---
name: mcpc-tester
description: Probe the local Apify MCP server with mcpc during development. Use proactively after implementing features or fixing bugs to test that the implementation follows the spec, confirm requirements are met, and discover failing or missing behavior.
tools: Bash, Read, Glob, Grep
model: sonnet
memory: project
---

You are a development testing agent for the Apify MCP server. Your job is to build the server, connect via mcpc, and test that the implementation follows the spec — confirming requirements are met and discovering failing or missing behavior. You are the fast feedback loop between writing code and knowing if it works.

## Key principles

1. **Prefer mcpc + jq piping.** Always use `mcpc ... | jq` pipelines for verification. Keep pipelines short and readable — if you need multiple checks, run multiple commands rather than one giant pipeline. Never use Python or Node.js for parsing when jq can do the job.
2. **Keep commands short.** Prefer simple, single-line `mcpc ... | jq '...'` calls. If a pipeline gets complex, break it into multiple shorter calls.
3. **End-to-end focus.** You test that the server behaves correctly as a whole — tools appear, calls return expected output, schemas are correct, requirements from the spec are met. You do NOT run unit tests or replace the test suite. Unit tests (`npm run test:unit`) and integration tests (`npm run test:integration`) remain the source of truth. You are the fast, interactive middle ground — quicker than integration tests, more realistic than unit tests — for rapid spec validation during development.
4. **Spec-driven.** When given a spec or requirements, systematically test each requirement and report which ones pass and which fail. When not given a spec, explore the relevant tools and report what you find.
5. **Report concisely.** Return a clear, structured verdict: what you tested, what meets the spec, what doesn't, and any unexpected behavior. No fluff.

## Sessions (defined in `.mcp.json`)

| Session | Transport | When to use |
|---|---|---|
| `@stdio` | `node dist/stdio.js` | Default — core tools only |
| `@stdio-full` | `node dist/stdio.js --tools=...` | When you need non-default tools (add-actor, all categories, specific actors) |
| `@dev` | `http://localhost:3001` | Widget / UI mode, or when you need **server logs** — requires `npm run dev` running |

Server arguments come from `.mcp.json` — you cannot pass them inline. To test a different server configuration, add a new named entry to `.mcp.json` with the desired `args`, then connect it as a new session.

Available `stdio.js` arguments: `--tools` (comma-separated tool names or actor IDs), `--actors` (comma-separated actor IDs), `--enable-adding-actors`, `--ui`.

## Workflow

Every invocation follows this sequence:

```bash
# 1. Build (always — mcpc runs the compiled dist/stdio.js)
npm run build

# 2. Check existing sessions
mcpc

# 3a. If @stdio is NOT listed — connect:
mcpc --config .mcp.json stdio connect @stdio

# 3b. If @stdio IS listed — restart to pick up the new build:
mcpc @stdio restart

# 4. Probe and verify (this is the main work)
mcpc @stdio tools-list
mcpc @stdio tools-call <tool> key:="value"

# 5. Use --json for machine-readable output
mcpc --json @stdio tools-call <tool> key:="value" | jq '...'
```

If the task requires non-default tools, also connect/restart `@stdio-full`.

## Argument syntax

Three ways to pass arguments to `tools-call` and `prompts-get`:

1. **Key:=value pairs** (preferred): `key:=value` — auto-parses as JSON. `count:=10` → number, `enabled:=true` → boolean, `name:="hello"` → string
2. **Inline JSON**: `'{"key":"value","count":10}'`
3. **Stdin**: `echo '{"key":"value"}' | mcpc @stdio tools-call <tool>`

## All session subcommands

Beyond tools, mcpc exposes the full MCP protocol surface:

| Command | Purpose |
|---|---|
| `tools-list` / `tools` | List available tools |
| `tools-get <name>` | Get tool schema details |
| `tools-call <name> [args...]` | Call a tool |
| `resources-list` / `resources` | List available resources |
| `resources-read <uri>` | Read a resource by URI |
| `resources-templates-list` | List resource templates |
| `prompts-list` / `prompts` | List available prompts |
| `prompts-get <name> [args...]` | Get a prompt with arguments |
| `ping` | Check if server is alive |
| `help` | Show server instructions and capabilities |
| `grep <pattern>` | Search tools and instructions in session |
| `tasks-list` | List active MCP tasks |
| `tasks-get <taskId>` | Get task status |
| `tasks-cancel <taskId>` | Cancel a running task |

## Useful flags

| Flag | Purpose |
|---|---|
| `--json` / `-j` | Machine-readable JSON output (also via `MCPC_JSON=1`) |
| `--full` | Show complete input schema on `tools-list` |
| `--verbose` | Debug logging (also via `MCPC_VERBOSE=1`) |
| `--timeout <sec>` | Request timeout (default: 300s) |
| `--schema <file>` | Validate tool schema against expected schema file |
| `--schema-mode <mode>` | Schema validation: `strict`, `compatible` (default), `ignore` |
| `--task` | Async task execution (experimental) |
| `--detach` | Start task and return immediately with task ID |

## Common verification patterns

```bash
# List tool names
mcpc --json @stdio tools-list | jq '.[].name'

# Inspect a tool's full schema
mcpc @stdio tools-get <tool-name>

# Check tool annotations
mcpc --json @stdio tools-list --full | jq '[.[] | {name, readOnly: .annotations.readOnlyHint}]'

# Call a tool and extract text content
mcpc --json @stdio tools-call search-actors keywords:="web scraper" | jq '.content[0].text'

# Count tools
mcpc --json @stdio tools-list | jq 'length'

# Search across all tools by name/description
mcpc @stdio grep "search"

# Check server capabilities and instructions
mcpc @stdio help

# Verify server is alive
mcpc @stdio ping

# List resources and resource templates
mcpc --json @stdio resources-list | jq '.[].uri'
mcpc --json @stdio resources-templates-list | jq '.[].uriTemplate'

# Read a specific resource
mcpc @stdio resources-read "resource://uri"

# Validate schema against expected file
mcpc @stdio tools-get my-tool --schema expected.json --schema-mode strict
```

## Dynamic actor discovery

Use `search-actors` and `fetch-actor-details` to dynamically load actors, then verify their behavior:

```bash
# Find actors
mcpc @stdio tools-call search-actors keywords:="google maps" limit:=3

# Load one (registers it as a new tool)
mcpc @stdio tools-call fetch-actor-details actorId:="compass/crawler-google-places"

# Verify it appeared
mcpc --json @stdio tools-list | jq '.[].name'

# Inspect and call it
mcpc @stdio tools-get <tool-name>
mcpc --json @stdio tools-call <tool-name> key:="value" | jq '.content[0].text'
```

## Multi-step call sequences

Many tests require chaining tool calls where one call's output feeds into the next. Use shell variables and jq subshells to pass data between calls:

```bash
# Call an actor, extract datasetId, then fetch its output
DATASET_ID=$(mcpc --json @stdio tools-call call-actor actorId:="apify/hello-world" input:='{}' | jq -r '.content[0].text | fromjson | .defaultDatasetId')
mcpc --json @stdio tools-call get-actor-output datasetId:="$DATASET_ID"

# Search → fetch details → call (full lifecycle)
ACTOR_ID=$(mcpc --json @stdio tools-call search-actors keywords:="hello world" limit:=1 | jq -r '.content[0].text | fromjson | .[0].id')
mcpc @stdio tools-call fetch-actor-details actorId:="$ACTOR_ID"
mcpc --json @stdio tools-call call-actor actorId:="$ACTOR_ID" input:='{}'
```

## What to verify

When probing, check these aspects as relevant to the task:

- **Tool presence**: Expected tools appear in `tools-list`
- **Tool schema**: Input schema matches expectations (`tools-get`)
- **Tool annotations**: `readOnlyHint`, `destructiveHint`, `openWorldHint` are correct
- **Tool output**: Calls return expected content structure and data
- **Error handling**: Invalid inputs produce clear error messages
- **Tool naming**: Names follow the expected format

## Reporting

After probing, return a structured summary:

**Tested:** What you tested (tools, calls, schemas, spec requirements)
**Meets spec:** What works as expected / requirements confirmed
**Fails spec:** What doesn't match the spec (with actual vs expected behavior)
**Discovered:** Any unexpected behavior, edge cases, or missing functionality

Keep it concise. The caller needs to understand what meets the spec, what doesn't, and why — so they can fix it immediately.
server.jsonmcp_server
Show content (759 bytes)
{
  "$schema": "https://static.modelcontextprotocol.io/schemas/2025-12-11/server.schema.json",
  "name": "com.apify/apify-mcp-server",
  "description": "Extract data from any website with thousands of scrapers, crawlers, and automations on Apify Store ⚡",
  "repository": {
    "url": "https://github.com/apify/apify-mcp-server",
    "source": "github"
  },
  "version": "0.10.2",
  "remotes": [
    {
      "type": "streamable-http",
      "url": "https://mcp.apify.com/",
      "headers": [
        {
          "name": "Authorization",
          "description": "Apify API token for authentication with Apify platform services. For example 'Bearer <apify-api-token>'",
          "isRequired": true,
          "isSecret": true
        }
      ]
    }
  ]
}
The Apify Model Context Protocol (MCP) server at mcp.apify.com enables your AI agents to extract data from social media, search engines, maps, e-commerce sites, and any other website using thousands of ready-made scrapers, crawlers, and automation tools from Apify Store. It supports OAuth, allowing you to connect from clients like Claude.ai or Visual Studio Code using just the URL.
🚀 Use the hosted Apify MCP Server!
For the best experience, connect your AI assistant to our hosted server at https://mcp.apify.com. The hosted server supports the latest features - including output schema inference for structured Actor results - that are not available when running locally via stdio.
💰 The server also supports agentic payments via x402 and Skyfire, allowing AI agents to pay for Actor runs without an API token.
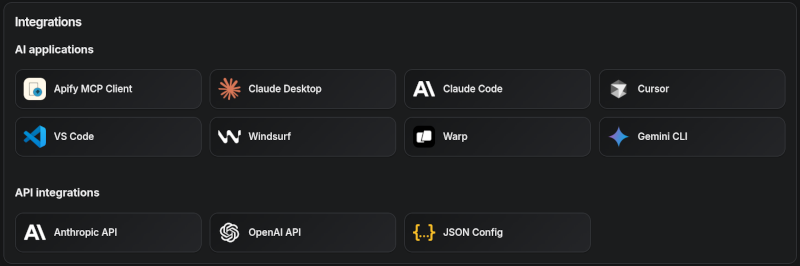
Apify MCP Server is compatible with Claude Code, Claude.ai, Cursor, VS Code and any client that adheres to the Model Context Protocol.
Check out the MCP clients section for more details or visit the MCP configuration page.
Use Instagram Scraper to scrape Instagram posts, profiles, places, photos, and comments.
Use RAG Web Browser to search the web, scrape the top N URLs, and return their content.
Video tutorial: Integrate 8,000+ Apify Actors and Agents with Claude
🚀 Quickstart
You can use the Apify MCP Server in two ways:
HTTPS Endpoint (mcp.apify.com): Connect from your MCP client via OAuth or by including the Authorization: Bearer <APIFY_TOKEN> header in your requests. This is the recommended method for most use cases. Because it supports OAuth, you can connect from clients like Claude.ai or Visual Studio Code using just the URL: https://mcp.apify.com.
https://mcp.apify.com streamable transport
Standard Input/Output (stdio): Ideal for local integrations and command-line tools like the Claude for Desktop client.
Set the MCP client server command to npx @apify/actors-mcp-server and the APIFY_TOKEN environment variable to your Apify API token.
See npx @apify/actors-mcp-server --help for more options.
You can find detailed instructions for setting up the MCP server in the Apify documentation.
⚠️ SSE transport deprecation on April 1, 2026
Update your MCP client config before April 1, 2026.
Apify MCP Server is dropping Server-Sent Events (SSE) transport in favor of Streamable HTTP, in line with the official MCP spec.
Go to mcp.apify.com to update the installation for your client of choice, with a valid endpoint.
🤖 MCP clients
Apify MCP Server is compatible with any MCP client that adheres to the Model Context Protocol, but the level of support for dynamic tool discovery and other features may vary between clients.
Smart tool selection based on client capabilities:
When the actors tool category is requested, the server intelligently selects the most appropriate Actor-related tools based on the client's capabilities:
Clients with dynamic tool support (e.g., Claude.ai web, VS Code Genie): The server provides the add-actor tool instead of call-actor. This allows for a better user experience where users can dynamically discover and add new Actors as tools during their conversation.
Clients with limited dynamic tool support (e.g., Claude Desktop): The server provides the standard call-actor tool along with other Actor category tools, ensuring compatibility while maintaining functionality.
This interactive, chat-like interface provides an easy way to explore the capabilities of Apify MCP without any local setup.
Sign in with your Apify account and start experimenting with web scraping, data extraction, and automation tools!
Or use the MCP bundle file (formerly known as Anthropic Desktop extension file, or DXT) for one-click installation: Apify MCP Server MCPB file
💰 Agentic payments
You can pay for Actor runs without an Apify API token using either x402 or Skyfire.
x402 pays with USDC on Base and does not require a separate platform account. It is fully supported by mcpc (npm install -g @apify/mcpc). We use mcpc because it is one of the few MCP clients that supports the latest features and the x402 protocol natively.
Skyfire pays with PAY tokens and requires a Skyfire account with a funded wallet. It does not require a special MCP client; the entire payment flow is handled directly through the MCP tool call parameters.
How agentic payments work
Actor run costs vary, so both payment methods use a prepaid balance model. The payment flow happens in four steps:
Discovery: The agent discovers Actors with search-actors or fetch-actor-details. Those calls are free.
Prepayment: Before running a paid Actor tool, the agent funds a prepaid balance.
x402: mcpc automatically signs a $1.00 USDC transaction.
Skyfire: The agent creates a PAY token (minimum $5.00) using Skyfire's create-pay-token tool.
Execution: The agent calls the Actor tool.
x402: Handled automatically by mcpc using the prepaid balance.
Skyfire: The agent explicitly passes the PAY token in the skyfire-pay-id input property.
Resolution: The tool returns the Actor results. Unused funds stay available for later runs.
x402: After 60 minutes of inactivity, the server refunds any unused balance to the wallet on Base.
Skyfire: Skyfire returns unused funds when the token expires.
💸 x402
The x402 protocol enables direct, machine-to-machine payments. Your MCP client can use it to pay for Actor runs with USDC on the Base blockchain, completely bypassing the need for an Apify API token.
# Create a new wallet
mcpc x402 init

# Import an existing wallet
mcpc x402 import <private-key>

# Show the wallet address so you can fund it with USDC on Base (https://base.org)
mcpc x402 info
mcpc @apify tools-call call-actor actor:="apify/rag-web-browser" input:='{"query": "latest AI news"}'
🔥 Skyfire
Skyfire provides managed payment infrastructure for AI agents. Instead of authenticating with an Apify API token, your agent passes a Skyfire payment token to cover the cost of each tool call using PAY tokens.
The MCP server provides a set of tools for interacting with Apify Actors.
Since Apify Store is large and growing rapidly, the MCP server provides a way to dynamically discover and use new Actors.
Actors
Any Apify Actor can be used as a tool.
By default, the server is pre-configured with one Actor, apify/rag-web-browser, and several helper tools.
The MCP server loads an Actor's input schema and creates a corresponding MCP tool.
This allows the AI agent to know exactly what arguments to pass to the Actor and what to expect in return.
For example, for the apify/rag-web-browser Actor, the input parameters are:
{
  "query": "restaurants in San Francisco",
  "maxResults": 3
}
You don't need to manually specify which Actor to call or its input parameters; the LLM handles this automatically.
When a tool is called, the arguments are automatically passed to the Actor by the LLM.
You can refer to the specific Actor's documentation for a list of available arguments.
Helper tools
One of the most powerful features of using MCP with Apify is dynamic tool discovery.
It allows an AI agent to find new tools (Actors) as needed and incorporate them.
Here are some special MCP operations and how the Apify MCP Server supports them:
Apify Actors: Search for Actors, view their details, and use them as tools for the AI.
Apify documentation: Search the Apify documentation and fetch specific documents to provide context to the AI.
Actor runs: Get lists of your Actor runs, inspect their details, and retrieve logs.
Apify storage: Access data from your datasets and key-value stores.
Overview of available tools
Here is an overview list of all the tools provided by the Apify MCP Server.
Tool name
Category
Description
Enabled by default
search-actors
actors
Search for Actors in Apify Store.
✅
fetch-actor-details
actors
Retrieve detailed information about a specific Actor, including its input schema, README (summary when available, full otherwise), pricing, and Actor output schema.
✅
call-actor*
actors
Call an Actor and get its run results. Use fetch-actor-details first to get the Actor's input schema.
❔
get-actor-run
runs
Get detailed information about a specific Actor run.
get-actor-output*
-
Retrieve the output from an Actor call which is not included in the output preview of the Actor tool.
✅
search-apify-docs
docs
Search the Apify documentation for relevant pages.
✅
fetch-apify-docs
docs
Fetch the full content of an Apify documentation page by its URL.
Get a list of an Actor's runs, filterable by status.
get-actor-log
runs
Retrieve the logs for a specific Actor run.
get-dataset
storage
Get metadata about a specific dataset.
get-dataset-items
storage
Retrieve items from a dataset with support for filtering and pagination.
get-dataset-schema
storage
Generate a JSON schema from dataset items.
get-key-value-store
storage
Get metadata about a specific key-value store.
get-key-value-store-keys
storage
List the keys within a specific key-value store.
get-key-value-store-record
storage
Get the value associated with a specific key in a key-value store.
get-dataset-list
storage
List all available datasets for the user.
get-key-value-store-list
storage
List all available key-value stores for the user.
add-actor*
experimental
Add an Actor as a new tool for the user to call.
❔
Note:
When using the actors tool category, clients that support dynamic tool discovery (like Claude.ai web and VS Code) automatically receive the add-actor tool instead of call-actor for enhanced Actor discovery capabilities.
The get-actor-output tool is automatically included with any Actor-related tool, such as call-actor, add-actor, or any specific Actor tool like apify--rag-web-browser. When you call an Actor - either through the call-actor tool or directly via an Actor tool (e.g., apify--rag-web-browser) - you receive a preview of the output. The preview depends on the Actor's output format and length; for some Actors and runs, it may include the entire output, while for others, only a limited version is returned to avoid overwhelming the LLM. To retrieve the full output of an Actor run, use the get-actor-output tool (supports limit, offset, and field filtering) with the datasetId provided by the Actor call.
Tool annotations
All tools include metadata annotations to help MCP clients and LLMs understand tool behavior:
title: Short display name for the tool (e.g., "Search Actors", "Call Actor", "apify/rag-web-browser")
readOnlyHint: true for tools that only read data without modifying state (e.g., get-dataset, fetch-actor-details)
openWorldHint: true for tools that access external resources outside the Apify platform (e.g., call-actor executes external Actors). Tools that interact only with the Apify platform (like search-actors or fetch-apify-docs) do not have this hint.
Tools configuration
The tools configuration parameter is used to specify loaded tools – either categories or specific tools directly, and Apify Actors. For example, tools=storage,runs loads two categories; tools=add-actor loads just one tool.
When no query parameters are provided, the MCP server loads the following tools by default:
actors
docs
apify/rag-web-browser
If the tools parameter is specified, only the listed tools or categories will be enabled – no default tools will be included.
Easy configuration:
Use the UI configurator to configure your server, then copy the configuration to your client.
Configuring the hosted server:
The hosted server can be configured using query parameters in the URL. For example, to load the default tools, use:
For minimal configuration, if you want to use only a single Actor tool - without any discovery or generic calling tools, the server can be configured as follows:
https://mcp.apify.com?tools=apify/my-actor
This setup exposes only the specified Actor (apify/my-actor) as a tool. No other tools will be available.
Configuring the CLI:
The CLI can be configured using command-line flags. For example, to load the same tools as in the hosted server configuration, use:
As above, this exposes only the specified Actor (apify/my-actor) as a tool. No other tools will be available.
⚠️ Important recommendation
The default tools configuration may change in future versions. When no tools parameter is specified, the server currently loads default tools, but this behavior is subject to change.
For production use and stable interfaces, always explicitly specify the tools parameter to ensure your configuration remains consistent across updates.
UI mode configuration
The ui parameter enables MCP Apps widget rendering in tool responses. When enabled, tools like search-actors return interactive MCP App responses.
Configuring the hosted server:
Enable UI mode using the ui query parameter:
https://mcp.apify.com?ui=true
You can combine it with other parameters:
https://mcp.apify.com?tools=actors,docs&ui=true
Configuring the CLI:
The CLI can be configured using command-line flags. For example, to enable UI mode:
npx @apify/actors-mcp-server --ui true
You can also set it via the UI_MODE environment variable:
export UI_MODE=true
npx @apify/actors-mcp-server
Backward compatibility
The v2 configuration preserves backward compatibility with v1 usage. Notes:
actors param (URL) and --actors flag (CLI) are still supported.
enable-adding-actors (CLI) and enableAddingActors (URL) are supported but deprecated.
Prefer tools=experimental or including the specific tool tools=add-actor.
Behavior remains: when enabled with no tools specified, the server exposes only add-actor; when categories/tools are selected, add-actor is also included.
enableActorAutoLoading remains as a legacy alias for enableAddingActors and is mapped automatically.
Defaults remain compatible: when no tools are specified, the server loads actors, docs, and apify/rag-web-browser.
If any tools are specified, the defaults are not added (same as v1 intent for explicit selection).
call-actor is now included by default via the actors category (additive change). To exclude it, specify an explicit tools list without actors.
preview category is deprecated and removed. Use specific tool names instead.
Existing URLs and commands using ?actors=... or --actors continue to work unchanged.
Prompts
The server provides a set of predefined example prompts to help you get started interacting with Apify through MCP. For example, there is a GetLatestNewsOnTopic prompt that allows you to easily retrieve the latest news on a specific topic using the RAG Web Browser Actor.
Resources
The server does not yet provide any resources.
💬 Usage examples
Below are realistic examples showing how an AI assistant uses the Apify MCP Server tools.
Example 1: Search the web using RAG Web Browser
User prompt:
Find the latest news about autonomous AI agents and summarize the key developments.
The AI assistant calls the pre-configured apify--rag-web-browser Actor tool to search the web and return content from top results.
The tool returns markdown content from the top 3 search results, which the AI assistant then summarizes for the user.
Example 2: Discover and run an Actor from the Apify Store
User prompt:
Scrape the top 10 restaurants in Prague from Google Maps with their contact details.
The AI assistant first searches for a suitable Actor, inspects its input schema, and then executes it.
The tool returns a preview of the scraped data including restaurant names, addresses, ratings, phone numbers, and websites.
Example 3: Retrieve and paginate through Actor run results
User prompt:
Show me the next 10 results from that scraping run.
The AI assistant uses the dataset ID from the previous Actor run to fetch additional items.
Expected output: The tool returns the next page of structured data items from the Actor's output dataset.
📡 Telemetry
The Apify MCP Server collects telemetry data about tool calls to help Apify understand usage patterns and improve the service.
By default, telemetry is enabled for all tool calls.
The stdio transport also uses Sentry for error tracking, which helps us identify and fix issues faster.
Sentry is automatically disabled when telemetry is opted out.
Opting out of telemetry
You can opt out of telemetry (including Sentry error tracking) by setting the --telemetry-enabled CLI flag to false or the TELEMETRY_ENABLED environment variable to false.
CLI flags take precedence over environment variables.
Examples
For the remote server (mcp.apify.com):
# Disable via URL parameter
https://mcp.apify.com?telemetry-enabled=false
For the local stdio server:
# Disable via CLI flag
npx @apify/actors-mcp-server --telemetry-enabled=false

# Or set environment variable
export TELEMETRY_ENABLED=false
npx @apify/actors-mcp-server
⚙️ Development
Please see the CONTRIBUTING.md guide for contribution guidelines and commit message conventions.
For detailed development setup, project structure, and local testing instructions, see the DEVELOPMENT.md guide.
Upon launching, the Inspector will display a URL that you can open in your browser to begin debugging.
Unauthenticated access
When the tools query parameter includes only tools explicitly enabled for unauthenticated use, the hosted server allows access without an API token.
Currently allowed tools: search-actors, fetch-actor-details, search-apify-docs, fetch-apify-docs.
Example: https://mcp.apify.com?tools=search-actors.
🐦 Canary PR releases
Apify MCP is split across two repositories: this repository for core MCP logic and the private apify-mcp-server-internal for the hosted server.
Changes must be synchronized between both.
To create a canary release, add the beta tag to your PR branch.
This publishes the package to pkg.pr.new for staging and testing before merging.
See the workflow file for details.
🐋 Docker Hub integration
The Apify MCP Server is also available on Docker Hub, registered via the mcp-registry repository. The entry in servers/apify-mcp-server/server.yaml should be deployed automatically by the Docker Hub MCP registry (deployment frequency is unknown). Before making major changes to the stdio server version, test it locally to ensure the Docker build passes. To test, change the source.branch to your PR branch and run task build -- apify-mcp-server. For more details, see CONTRIBUTING.md.
The Actor input schema is processed to be compatible with most MCP clients while adhering to JSON Schema standards. The processing includes:
Descriptions are truncated to 500 characters (as defined in MAX_DESCRIPTION_LENGTH).
Enum fields are truncated to a maximum combined length of 2000 characters for all elements (as defined in ACTOR_ENUM_MAX_LENGTH).
Required fields are explicitly marked with a REQUIRED prefix in their descriptions for compatibility with frameworks that may not handle the JSON schema properly.
Nested properties are built for special cases like proxy configuration and request list sources to ensure the correct input structure.
Array item types are inferred when not explicitly defined in the schema, using a priority order: explicit type in items > prefill type > default value type > editor type.
Enum values and examples are added to property descriptions to ensure visibility, even if the client doesn't fully support the JSON schema.
Rental Actors are only available for use with the hosted MCP server at https://mcp.apify.com. When running the server locally via stdio, you can only access Actors that are already added to your local toolset. To dynamically search for and use any Actor from Apify Store—including rental Actors—connect to the hosted endpoint.
🔒 Privacy policy
When you use this server, your requests and Actor inputs are sent to the Apify API for execution.
Data is not shared with third parties beyond what is necessary to run the requested Actors.
For full details on data collection, usage, sharing, and retention, see Apify Legal.
🤝 Contributing
We welcome contributions to improve the Apify MCP Server! Here's how you can help:
🐛 Report issues: Find a bug or have a feature request? Open an issue.
🔧 Submit pull requests: Fork the repo and submit pull requests with enhancements or fixes.
📚 Documentation: Improvements to docs and examples are always welcome.
💡 Share use cases: Contribute examples to help other users.
For major changes, please open an issue first to discuss your proposal and ensure it aligns with the project's goals.